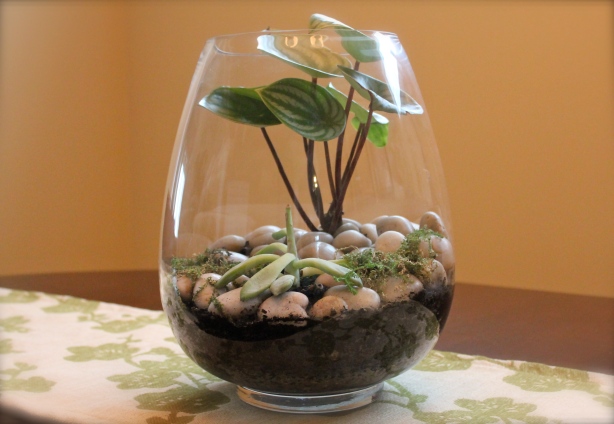
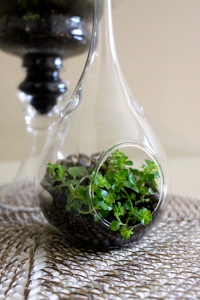
I have been struggling with a serious terrarium-making obsession.
My first urge to make a terrarium came last year, after reading an article in Real Simple magazine which had a couple of terrariums featured. I am notorious for my black thumb, especially when it comes to indoor plants, so I was a little nervous to make one for fear that I would inevitably kill it. I may be one of the few people to actually kill a bamboo plant, and my large indoor plants and trees have also been known to shrivel. I obviously haven’t mastered the technique of regular watering, which is all the more reason terrariums are right for me.
Last year, I set aside my fears and made my first terrarium, and it’s shockingly still alive! I’ve taken that as a sign to make more, and have documented my recent terrarium-making frenzy below.
When I sought out to make my first terrarium last year, I went to Emery’s Garden (my favorite local nursery) for help with supplies and instructions on the best way to assemble it. Sadly, Emery’s Garden shut down this past fall, otherwise I’d link to their site. They were super helpful and gave me tips on putting it together and helped me choose the right plants. I put one succulent in my first terrarium (against the advice of the nursery employee) and somehow it’s not dead, despite being in the wrong type of soil and getting way more water than it needs. It might look a little wonky because I accidentally lopped off a couple of its limbs while planting it. He has character…
I was hoping to make an all-succulent terrarium this time, as succulents are another obsession of mine, but that will have to wait until the next round (click here for Succulents Galore!). Enclosed containers are not ideal for succulents since they prefer less water and humidity, and 2 of the containers I had were enclosed. For this project, I chose plants that thrive in high humidity.
Supplies:
- glass container
- horticultural charcoal
- washed gravel (optional)
- decorative rocks (optional)
- potting mix
- assorted indoor plants
*For succulents or cacti, use cactus mix instead of potting mix and an open container. Make sure that plants in one container share the same water, light, and soil preferences.
Step Three – Layer washed gravel over the charcoal. This is an optional step as the charcoal itself can provide drainage, but the look of the contrasting layers is one of my favorite aspects of terrariums. For me, it’s a must!
Step Four – Arrange your plants. If your container is deep enough, you may want to add a layer of soil before placing them. This one was a tight squeeze, so I made sure my plants had a decent chunk of soil attached to their roots and then placed them in. If the opening to your container is small, you can use long tweezers or even chopsticks to put them in their place.
Step Five – Add potting mix, additional decorative rocks, and water the soil just until moistened. Again, my container was pretty small, so I barely needed any soil to fill in the gaps between plants. I had a few larger rocks that I placed around the back for a little more height and interest.
Step Six – Close it up and place in bright, indirect sunlight. If you have a lid for your container, your terrarium will not need as much watering due to condensation. The glass may get a little foggy on a hot summer day so you might want to remove the lid on those occasions to let excessive condensation clear. Open containers will need more frequent watering.
I assembled these on an evening visit to my parents house for dinner. Why make a mess in my own house if I don’t have to!? If you subtract the time spent chasing after my toddler and nephew, the three terrariums would have probably taken about 20 minutes to assemble altogether.
I have a curved staircase, which I love, but along the staircase wall are several large awkwardly shaped built-in shelves. These have been a pain to decorate, but I finally have the perfect little grouping of terrariums to fill one of the spaces (the others are a work in progress). There are windows surrounding the area, so they will get plenty of indirect sunlight. I’m thinking this grouping needs a small sunburst mirror behind it to finish it off. One thing at a time…


Oh how pretty! I’ve been admiring terrariums for quite a while, but never thought I could pull one off. Now that you’ve posted the step by step, I think I can :). These are really nice! I’d love one with the succulents.
They are so easy. As soon as I figure out where to put another one in my house, I’ll be making one filled with succulents too! Thanks for the comment! 🙂
Thank you for the step by step – I love these! I am going to put a few together myself!! I had terrariums back in the late 70’s (showing my age), when they were very popular as well. I love the new “upscale” looking glass containers (with lids)!
Thanks! We could probably even find some unique containers at the flea market. I have some other ideas up my sleeve, so maybe we can go together soon?? 🙂
Reblogged this on Potted Plant Society.
[…] and made 4 tropical terrariums that thrive in enclosed containers with high humidity (check out Terrariums Galore! for all the details). My heart really belongs to the Succulent variety, so I have made 4 more […]
[…] that project), and a few of my favorite terrariums (see ‘Succulents Galore!‘ and ‘Terrariums Galore!‘ and learn how to make your […]
I can’t seem to find horticultural charcoal anywhere! Do you have any clue if I could order it online?
I found the horticultural charcoal at a local garden shop, but I just searched amazon.com and they have a few brands available to order for around $12. Good luck making a terrarium, they’re so much fun! 🙂